

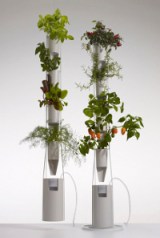
A friend of mine has got me quite excited about windowfarming. You could say the idea is growing on me. I live in a flat with a poor excuse for a balcony and has these ‘shiny’ white tiles which I don’t wish to get covered in soil. A windowfarm seems like the ideal alternative in such cases to introduce some greenery that is both clean and self-sustainable!
This particular ‘windowfarms DIY guide’ grows three plants and costs less than R300 to put together. The full DIY guide “How to make your own window farm” can also be downloaded at windowfarms.com
Windowfarm DIY – Materials Needed:
STEP 1: Gather all the tools and ingredients you will need to make your own windowfarm. You will also need things like a permanent marker or felt-tipped pen and a sharp knife.
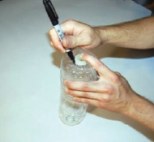
STEP 2: Using the cap of one of the 1.5 litre water bottles, trace circles on on the bottom-centre of each 1.5 litre water bottle and cut them into holes.
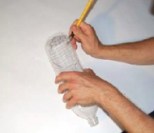
STEP 3: Now we need to create a space for each plant. Trace and cut large holes on the bottom part of each 1.5 litre bottle as illustrated.
STEP 4: Next we need to create an entrance in the 5 litre water bottle for the pumping tubes. Use the cap from this bottle to trace and cut a circle in the top shoulder of the 5 litre bottle.
STEP 5: We now need to cover the 1.5 litre bottles so that the plant roots don’t photosynthesize. You can either use fabric paint to do this, or simply wrap them with thick tape. Cover two thirds of all three bottles as illustrated.
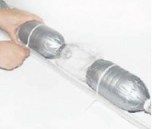
STEP 6: Once wrapped up we need to stack the three 1.5 litre bottles by inserting the tops of the bottles into the holes cut in the bottoms as illustrated. Attach the bottle stack to the rod and air lift tube using cable ties.
STEP 7: Next we need to connect the pump to the air lift tube. Make two small insertions for the needle tips up from the bottom of the air lift tube. Place holes on opposite sides of the air lift tube so that the pipes do not overlap.
STEP 8: Cut the adapter tubes and pump tubes to the appropriate lengths. Sleeve half of the adapter tube over the end of the pump tube as illustrated. Using tape, wrap the air pump needles until the threading is covered and sleeve those into the open end of the adapter tubes. Insert the needles into the air lift tube and secure these to the rod using cable ties.
Note: Make sure the mouth of the air lift tube is pointing straight down – flush with the rod. Ideally you want the whole tube to remain as straight and vertical as possible. Insert the rod with the tubing into the 5 litre base bottle. Make sure the mouth of the last plant-holding 1.5. litre bottle of the stack feeds into the mouth of the 5 litre base bottle.
STEP 9: Bend the top of the air lift tube and insert it into the top of the first plant-holding bottle – forming a “U” shape inside the bottle, with the end of the tube pointing down. Attach the air tubes to the pump. Full the 5 litre base bottle with water to test your pump. Water should spurt out the air lift tube into the top plant-holding bottle and begin draining down through the other bottles. If everything is working, you can then add plant nutrient into the reservoir (5 litre bottle).
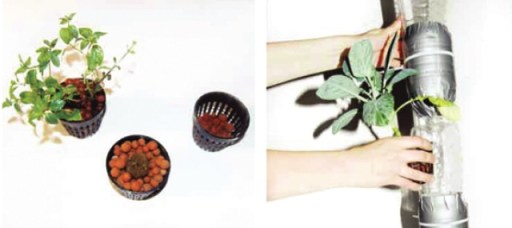
STEP 10: Place your plants into net cups and cover with clay pellets. You can either completely shake out the roots (to prevent dirt entering the system and clogging the pipes) or you can start your plants from seed by placing these in compost sponges.
Note: If you decide to start from seed, run your system without plant nutrients for the first week. If you start with adult plants, leave the lights off for the first few days. This will help the roots grow better and will help the plants recover from ‘transplant shock.’
STEP 11: Place each plant of choice into the large openings of the 1.5 litre plant-holder bottles. Switch on your pump and viola! Adjust each bottle so that the plants are facing the light source from your window.
Important Note: Take caution not to place your windowfarm too close to an electrical outlet. Loop your cords before plugging them in to prevent water from flowing along them towards the outlet.
STEPS 12 (OPTIONAL):
I hope you found this Windowfarms DIY Guide helpful.
Happy eco-farming!